On a Kindness Mission-Creating Inspirational ATC’s on Gelli Prints

THE MISSION

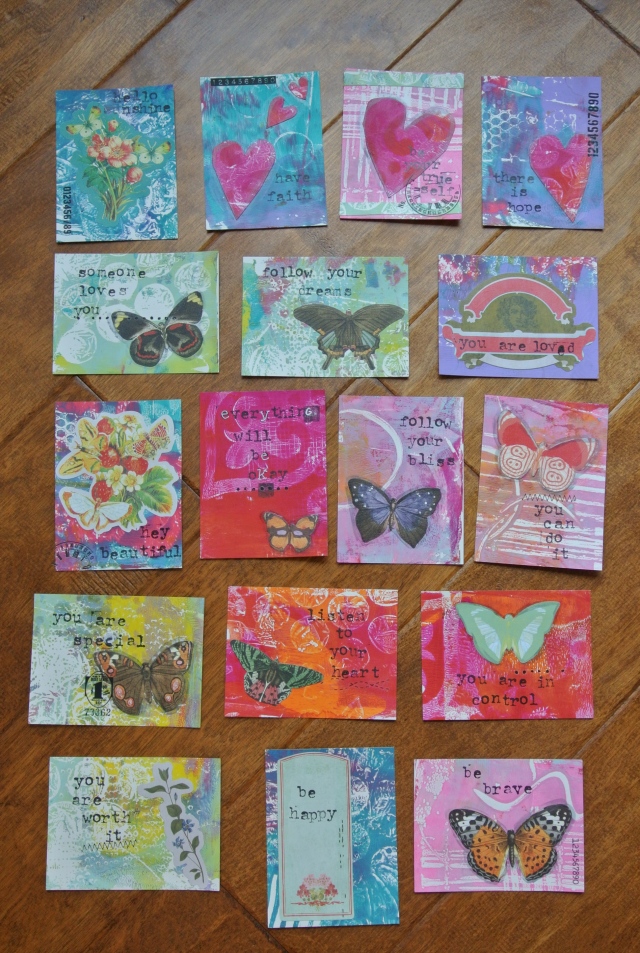
As I’m sure everyone in the world must know by now, I love Gelli printing. 🙂 Now that I have amassed so many prints, I’m trying to find creative ways to use them. Then I read a really inspirational blog post from Kelly Rae Roberts about her Kindness Mission. I was really moved by this mission to spread kindness in little ways to perfect strangers or those who may be in need of a kind word or uplifting thought. So with that in mind I pulled out my ever growing stack of Gelli prints and went to work.

THE PROCESS

First, I picked out several of my favorite prints. Then, I cut them down to ATC size. I had printed them all on Strathmore Mixed Media paper, which has a really nice weight to it. I discovered a whole unused box of SEI diecuts and found them to be perfect to use on the backgrounds. I attached them using matte medium.

I am a runner, and I find that when I run (about 3/4 of the way through the first mile) my mind becomes very clear. I was thinking about the Kindness Mission and what would be some good ideas to use to help bring a little comfort or joy into someone’s life. As I ran, I came up with a list in my head of several phrases. The next day I sat down with my favorite little letter stamp set and stamped all of the sentiments onto the cards. What was funny (as I look back), was that day was a particularly rough day for me. One of those days where absolutely nothing was going right. My daughter lost her cell phone that morning, another one got sick on her second day of kindergarten, my stamps were falling apart, movers that had been scheduled were 45 minutes late to a job, etc….So as I was working on these cards the messages became self directed. I really needed to hear a lot of what I was trying to say!

DSC_0947

DSC_0946

DSC_0948

DSC_0949

THE RESULT

Today as I head out, these little lovelies will be shared with others. One was left on the treadmill at the club. Another at the gas pump, the bookstore, the grocery store…And hopefully they will be enjoyed and maybe even shared with others who may need a boost today! What kind thing will you do today? 🙂
DSC_0945

How to Create an Art Journal Page with an Image Transfer-Using Frog Dog Studio’s July Mixed Media Kit

Good morning, I wanted to share a tutorial on how I created a page in my art journal using our Frog Dog Studio’s July mixed media kit supplies. You can also find this tutorial on the Frog Dog Studio Blog.

For my journal page this month I wanted to try and conquer my nemesis…the image transfer! I have books on techniques, have watched tutorials, and even had a lesson on this from the very talented Donna Downey and I still can’t seem to get this nailed! Practice makes perfect, right? So I decided to give it another go using the clip art and matte medium from this month’s kit. I started out by choosing an image from the sheet, cutting it out, covering it with the matte medium, and laying it face down on the page. I then burnished it using my brayer.

I misted the image with water, adding more as needed, and gently began rubbing off the back side of the image. The paper was really wet and crumbly, but I could see the image coming through pretty good.

Next I added some strips of washi tape around the image transfer. I also used the paint dabbers from the kit to add some color.

I wanted to add a punch of color, so I got out my Pan Pastels and used a foam sponge to work the yellow colors into the entire background. I used another Pan Pastel in red to blend in the edges and add some pop. Then, I used a circle stamp from Claudine Hellmuth and Ranger Archival ink to add some contrast.

Music often inspires me, and while I was working on this page the song “Dream” by Priscilla Ahn came on my mix. How perfect to go with my bird themed page! I cut out another bird and the letters for FLY and SWING from the clip art sheet, then got out my trusty cheap-o letter stamps to create the journaling on my page.

Well my image transfer still wasn’t 100%, but that’s the thing about art journaling–it’s a great place to practice, make mistakes, and experiment. Don’t be afraid to try something new today!

How to Create a Mixed Media Memory Box–Using the July Frog Dog Studio Mixed Media Kit

Good morning, I wanted to share my tutorial on how I altered the cute little box from our July kit. This tutorial can also be found on the Frog Dog Studio blog.

I love quotes. They make me feel good. I usually try and incorporate them into my journal pages and other mixed media pieces. This little box was no exception. The birds from the Artchix collage sheet inspired me to find a perfect quote. I was thinking of my sister at the time. She’s was going through a rough patch and I wanted to send some healing and positive thoughts her way. With this in mind I went to work on altering the box first.

The first thing I did was cut patterned paper to line the entire inside of the box. I used the Claudine Helmuth matte medium to do this. I should say here that I love this stuff! It goes on wonderfully smooth, adheres well without making your hands all sticky, and has no odor that I could detect. The last thing is very important to me, as I have young children who are almost always in the room with me when I’m creating. When that was complete, I marked the edges of the box and attached the Tim Holtz hinges. Then I wrapped the edges of the inside lid with the Prima washi tape to cover the brad prongs.

The next step was to cover the lid and sides using the Ranger paint dabbers. I just dabbed and mixed with the end of a dry paintbrush until I got a nice distressed finish. I also added some paint to the hinges. Then I created a mini collage using the Artchix clip art and a few bits of washi tape. Over the top I added the crackle finish and the little cabochon (from my stash) in the corner. I also used some leftover paper twine from the June kit to make the little bow. Everything was adhered using the matte medium from the kit.

I continued to collage the other sides of the box, using some papers from my stash, the paint dabbers from the kit, and washi tape.

I got all of the little cards together that fit inside of the box and laid them out. I decided to do little mini collages for each one, add a quote, and tie them all together like a fold out banner. Using the paint dabbers I started creating the background for each one. I then cut out images from the clip art sheet and inked all of the edges using Distress Ink in Vintage Photo (a favorite of mine for sure!). I also used the Prima washi tape and a roller stamp to tie all of the pieces together. I made sure to use the same basic materials for each mini collage, but added something a little different for each one. I wanted it to have a cohesive look. I found a quote that I liked, printed it out, and cut it up into smaller bits to add to each piece.

To finish off the mini banner, I collaged some inspirational words that I cut out from a thesaurus and glued them to the backside of the squares. I punched holes in the pieces and tied them all together, again using the leftover twine from the June kit. I also inked around the edges using the green paint dabber.

And here is the final product!

Thanks for stopping by–have fun creating! 🙂

July Frog Dog Studio Kit Reveal

Hi everyone! I am so behind on my blogging…

First off, the new Frog Dog Studio July kit is out and it is a good one! Check out all of these awesome goodies:

Frog Dog July kit

The July Mixed Media Kit includes:

(1) Maya Road 3″ Vintage Memory Box with Coaster Album
(1) .5 oz Bottle of Crackle Accents
(1) Bottle of ‘Peeled Paint, Distress Paint
(1) Bottle of ‘Antique Linen, Distress Paint
(1) 4 oz Jar of Claudine Hellmuth Studio Multi-Medium
(1) Roll of Prima Washi Tape (colors/design may vary)
(1) Package Tim Holtz Hinges
(1) ‘Pretty Bird Notes’ Ephemera sheet from ARTChixStudio

Here are my Design Team projects that I created using the kit:

DSC_0744

DSC_0743

DSC_0764

Be sure to check out the Frog Dog Studio Blog for mine, as well as my fellow DT member’s tutorials on all of this month’s projects.

I also wanted to let you know about our Refer A Friend promotion. Check out the post HERE to find out all of the details. It’s a great deal and a fun way to share mixed media with friends.

I also managed to squeeze in a project from my LifeBook class-Week 18. A Page of Affirmations with Dawn DeVries Sokol. It was a quick and fun exercise-even though I struggle with praising myself for anything.

Page of Affirmations with Dawn DeVries Sokol

Thanks for stopping by!

Art Journal and Mini Canvas tutorial + A Special Mixed Media Project

Hi everyone! I hope you are all enjoying your weekend. I’m taking a quick moment to catch up on my blogging. Between today’s basketball tournament for one daughter and the other’s dance recital–it’s going to be a busy day!

I wanted to let you know that I have my How to Create a Mini Mixed Media Canvas tutorial posted up on the Frog Dog Studio Blog, as well as the tutorial on How to Create a Textured Art Journal Page. I hope you will stop by and take a look.

Don’t forget to sign up for the monthly mixed media kits offered by Frog Dog Studio. They have all kinds of great supplies and I can assure you there are some real goodies coming up for July 🙂

In other news, I was asked by my sister-in-law to create a fun and funky mixed media piece for their new home in Austin. Of course I was happy to do so 🙂 I bought a plain 16 x 20 art board and went to work. She liked the idea of a skyline, so I searched Google images and found a basic shaped skyline. From that I gathered assorted papers (scrapbook papers, book pages, and old sticker sheet of my daughter’s, etc.) and began cutting them into the general shapes of the buildings. I laid them down on the board to make sure everything would fit properly. Then I started on the background. The board was already gessoed, so I was able to get right to work. I mixed several different paints, stencils, spray inks, and modeling paste to create a background with lots of texture and color.

The next step was to use the Claudine Helmuth matte medium to glue down the buildings. Then I tore up bits of paper and washi tape to create the details. I outlined everything with a pen, then I went back to the background. Using heavy gel medium, I attached lots of different beads and sequins to really add some dimension to the piece. I also added some rubons and used a roller stamp randomly. Once everything was dry, I sprayed the entire thing with a fixative. I didn’t want everything all running together. After the fixative dried, I put a coat of Golden clear self leveling gel to finish it off. It adds a heavy gloss and seals and protects the entire piece. I am really happy with the end result, I hope that she likes it!

DSC_0765

DSC_0766

DSC_0767

DSC_0768

Thanks for stopping by, I will be back in a few days with another fun project I plan to start this weekend for my daughter’s room…stay tuned!

The Time Has Come…Frog Dog Kit Reveal Today!

Good afternoon everyone! Well the day has finally come for the very first reveal of the Frog Dog Studio June Mixed Media Kit. Tina has packed this kit with all kinds of mixed media goodness 🙂 Stop by the store to check it out and order your kit–they are going fast!! Click Here to visit the Frog Dog Studio Home Page. You can also visit the Frog Dog Studio Blog here. Throughout the month of June you will find educational tutorials showing how all of the DT members created their projects using the kit materials. My first tutorial is up on June 5, be sure to stop by and check it out!

In the meantime, here are the projects that I created using the June kit:
DSC_0567

DSC_0568

DSC_0638

Thanks for stopping by, enjoy your weekend!

DSC_0640

DSC_0648

DSC_0651

DSC_0652

Some Facecinating girls and LifeBook catch up time!

Hi everyone, I hope you all enjoyed the long weekend–I know I sure did. We spent all day Saturday and Sunday at my daughter’s basketball tournament, so Monday was a welcome break 🙂 Although we did end up spending most of it out car shopping… my vehicle is getting up there in miles and it’s time to replace it.

Anyhoo….I’ve been a bit sidetracked from my LifeBook class over the last 2 months. I’ve really been wanting to master doing faces and when I saw the Facecinating Girls 3 week online course from Andrea Gomoll, I decided to jump in. What I love about this class (other than sweet Andrea) is that it comes with a clear stamp set that really helps take the pressure off as far as trying to draw a perfect face. I’ve learned a lot about shading, which is really something I needed. The class really is a great value and I highly recommend it if you are looking for an easy breakdown on face painting.

Also, for my birthday I received Mixed Media Girls by Suzi Blu. I’m just going to say that I think she is AWESOME and leave it at that. I can’t wait to sign up for some of her classes, but I think I need to get through LifeBook first. Between that and the new Frog Dog design team there isn’t room for much else, and I am ok with that. So here we are. I just wanted to share with you a few things that I’ve been working on in my art journals as a result of these classes and such.
This first sketch is done with just some basic shading with a Faber Castell Gelato:
DSC_0715
This one was done with PrismaColor pencils:
DSC_0714
This one was done with the PrismaColor pencils and Inktense blocks:
DSC_0711
The next two are fully completed using acrylic paints, the PrismaColor pencils again, and the Inktense blocks, and Gelatos:
DSC_0717
DSC_0716
And a few sketches based on Suzi Blu’s book. I know these need quite a bit more work. Practice, practice!!! 🙂
DSC_0713
DSC_0712
And finally my project for Life Book 2013 – Week 16 – Bottoms Up with Aimee Meyers Dolich:
Bottoms UP
And that’s it for the day! Hope I didn’t overload you too much 🙂 Stay tuned for the reveals at Frog Dog Studios this weekend–so exciting!

I’m Dylusional!! :)

When I get obsessed I go all out…and that is exactly what happened when I discovered the awesome stamp sets by Dyan Reaveley!! I’ve been using the Dylusions spray inks for quite a while now, but never looked into any of her other products. Don’t ask me why, I can’t believe it took me so long 🙂 So I had myself a mini spending spree and ordered several stamp sets and stencils, as well as her Art Journal. Let me just say that I have quite a number of art journals with all different types of papers, etc., but this one takes the cake! The size is perfect and the papers are just made for mixed media. They hold up really well to all of the spraying, layering, and stamping. No buckling or curling at all. I am in love 🙂 With that said, I’d like to share a few pages that I whipped up using the stamps, inks, stencils, and magazine bits. I also used the Silks by Luminarte, which I am also in love with. The colors are really vibrant and I love playing with them!
DSC_0600
DSC_0601

I have another journal that is small (5 x 7) filled with a kraft colored paper that I occasionally work in. I am using a heart theme throughout this one. I thought I’d share a few pages of this one also. It is still a work in progress 🙂
DSC_0604
DSC_0605
DSC_0606
DSC_0607

Well, that is all for now. Stay tuned though, I have some really big and exciting news to share with everyone later this month. I can’t wait! 🙂

The Good, the Bad, and The Ugly—and Quirky Birds :)

This week I was able to play catch up with my LifeBook 2013 lessons. I can’t say enough about this experience, I have already learned so much!! The teachers are amazing and the work that everyone is putting up is truly inspiring. This week I was able to complete the lesson from Week 11-The Good, the Bad, and the Ugly with Michelle Kral (also known as Misti B).This lesson was so liberating. The whole purpose is just to celebrate and embrace the good, bad, and ugly side of ourselves. We were encouraged to let our ugly out. Well, I feel like I certainly did. This piece is pretty hideous, but I finally felt something in myself just let go–I think for the first time ever. I usually worry over what people will think about my art and feel like it always has to be perfect, but not this time. Here it is, in all of it’s hideousness…
The Good, the Bad, The Ugly
Pretty ugly, eh? 🙂
Now this week’s lesson was a total blast. We made “quirky birds” and used song lyrics that help to ground us and help us celebrate the “now”. Everytime I hear the song “The Luckiest” by Ben Folds I think of my husband. It’s a really beautiful song, if you’ve never heard it you should check it out. We made this as a really cool fold out accordion booklet. I may go back and do the back side with some more fun birds later on.
Quirky Birds
I hope you all enjoy your weekend! Thanks for stopping by 🙂

LifeBook Week 10 and 12–I Painted a Face!

Continuing on my LifeBook journey, I’ve completed Weeks 10 and 12. Week 10 we celebrated heart connections with Tam. We filled in our heart with rolled paper containing short messages to our heart connections. I wish the picture could convey the cool 3D look of this heart. What a beautiful lesson this was, and a great reminder of how important people are in our lives.
Heart Connections
Week 12 was Celebration and Connection with Mindy Lacefield. I’ve always enjoyed her style of art and wondered how she painted her adorable, whimsical faces. This was a great lesson for me, especially learning how to shade and create the faces. I’ve never been really good with faces, but she made this seem so easy. I like the primitive style of their faces. I realized when I finished the painting that I subconsciously ended up painting me and my son. This wasn’t my original intention, but I love how that’s how it turned out.
DSC_0447
I am hoping this weekend to possibly get to Week 11, which is about the Good, the Bad, and the Ugly with Michelle Kral. I’m looking forward to it, but there were a few supplies I needed before I could start this one.
I hope you all have a wonderful weekend and a Happy Easter! Thanks for stopping by 🙂